Thursday, December 27, 2012

Better Late Than Never (I guess)

I planned to get this post up BEFORE Christmas, but obviously didn't. Can you say blog fail?? I was just too busy with holiday stuff- decorating, shopping, wrapping, and lots of family gatherings.
I did manage to work in some crafting during all of this, in the form of gifts and Christmas decorations. I think most, if not all, of these ideas were found on Pinterest . I just read several blogs from pins I pinned, and put my own spin on them. I made some ornaments, a wreath, some pin cushions, and LOTS of coasters. All of these projects were easy-peasy-lemon-squeezy. I did not, however get many "during" pictures- mostly just "afters".

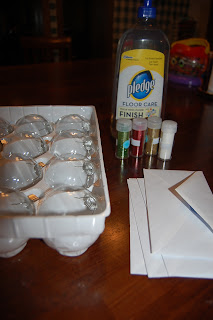
First up- Glitter Ornies. Yes, I know. These are EVERYWHERE, but they are super-easy and I just love them. All you need is the Pledge floor wax with the blue lid (at least, that is what it said in the tutorial I read here), glitter, clear christmas balls, and something to use for a funnel (I cut envelopes in half and then trimmes off the bottom corner-worked great!)


I won't go into the step-by-step since I have the link for a great tutorial above. I do think I will add some ribbon to them though. I just love how they look on the tree! (And no, I did not leave them this close together- just hung them close for good photo! )


 The red, green, and gold looked the best. The white glitter didn't cover as well. I wound up using sharpies to draw snowman faces on them. 


Not great, but cute.

Next up- deco mesh wreath. I couldn't find the site where I originally read about this idea, but if you search pinterest (or google for that matter), you can find a ton of great tutorials. This was easy (of course- I don't do difficult!) and I love how it turned out. I wound up hanging it on the inside of my front door, since no one uses that door and would never see it on the outside. It makes my entry way much more festive!
For this project, I bought a pain wire floral wreath frame (12 inch) at Hobby Lobby, some deco mesh, pipe cleaners, ribbon, a sign, and some picks. (Sign from Hob Lob and picks from Walmart).


First, I wrapped pipe cleaners around the little cross bars of the wreath. They were a good distance apart, and I thought they would make for good-sized loops for my mesh. In hindsight, I think I would use floral wire   instead of pipe cleaners because I think they would be easier to disguise beneath the mesh.


Next I attached the end of the mesh to the wreath with a pipe cleaner.


Next, I made a loop, or hump, whatever you want to call it, and secured it with the next pipe cleaner. I just played around with it until I got the size I wanted.


I continued this all the way around the wreath, using every pipe cleaner. When I got back around to the starting place, I could see that there was too much open space between the loops, and it wasn't nearly as full as I wanted it to be. I then continued with loops around the wreath just like I did for the first round, going to sides of the first set of loops (not on top). I alternated sides so that one loop went to the right of the first loop, and the next loop went to left of the second loop, and so on. Is that clear as mud?? Basically, I just snaked the second row of mesh around the first row. It turned out great, or at least I think it did.


I then took some wide, wired ribbon and made double loop faux bows. I wired the ends and then hot glued them into the wreath. I also clipped the picks in here and there. They had nifty little alligator clips on them, so no need for hot glue there. I made a bow with the same ribbon, attached it to wreath with wire, and then wired on a cute little sign I found on sale (holla!) at Hob Lob. They look pretty without the sign too, or you can put a Santa, snowman, or anything. I think a fake present would look really cute too!


More ornies!! For these, I used the bigger round balls (from Hob Lob of course). I put some fake shimmery snow in them (what a PAIN!) using the envelope funnel method I used for the glitter ornies. I used my Cameo to cut out initials for the Hubs, the kiddos, and myself. Then I added some cute ribbon. Bows for us girls, and a more manly tie for the Hubs.


If you are still with me, thanks for hanging in there! I know that is A LOT of Christmas crafting to cram into one post, but I though I should get it all in or some of it might not make the blog until next year. I also made some craft gifts (coasters and pin cushions) but I will save them for a post in the new year!

I hope you and your families had a wonderful Christmas and I wish you all the best for the New Year! Thanks for reading!
Wednesday, December 19, 2012

For Me???!!!

I can't believe I won a Hubby- this is awsomesauce! I NEVER win ANYTHING (yes, Pioneer Woman, I am talking to you)!! I love Hubby Jack - he is hilarious and great at teaching how to do some cool things to your blog. You HAVE to go check him out! While you are at it, check out his super-cool wife, Big Holly, over at Where We Can Live Like Jack and Sally. I am a stalker avid reader of both blogs and they are great!


button

Ok, ok... enough with the  posts about blog awards. My next post will be all about the latest Christmas crafts I have been making! Hopefully I will get it posted BEFORE Christmas!


Saturday, December 8, 2012

An Award Nomination....

So some sweet gal nominated me for a Liebster Award. Her name is Samantha Griffin and you should definitely check her blog out! Thanks Samantha!!

Now, according to the rules for this award, I have to nominate 11 bloggers who have less than 200 followers and have not yet been nominated. I had a hard time finding that many blogs that met those requirements. I then researched this award a bit and found that it originally called for nominating 5-8 blogs. Also, somewhere along the way I read that the follower requirement was less than 2000, not 200. Soooo....I stuck with the 200 follower rule, but went with 7 blogs that I like to read and thought you might too.

The other rules require me to answer 11 questions from the person who nominated me, tell 11 things about myself, and ask 11 questions of the people I nominate. Here goes.

Questions I was asked:
1- Are you an early bird or night owl? Neither really, but if I have to pick, I would say night owl.
2- Where would you like to travel (anywhere, any time)? Italy. Now.
3- What book, as a child, did you love the most? There were so many, but as a tween I loved the Babysitter's Club series (classics, I know! lol)
4- What do you struggle with (meant to be a broad question)? Patience with my kiddos and remembering they are just KIDS! Oh yeah, and my weight. Ugh.
5- If you had 3 days to live, what would be the first thing you would do? Spend time with my girls and my husband doing all the fun, silly, messy things they always want to go, but that I put off because I am too tired and it is too messy.
6- Do you talk or text most? Text.
7- What was the address to the first email account you made? My first email account was the one my university assigned to me as a student. I know my name was involved, but I never used it so I can't remember it.
8- When you were a child, what did you want to be when you grew up? Lawyer. What do you want to be now? Still working on that.
9- What are you currently obsessed with? Owls. Don't know why, but they are so cute!
10- Team Edward, Team Jacob, or Team I Don't Care? Team I can't choose!!
11-When was the last time you read a great book and what was it? I love the Flavia DeLuce series by Alan Bradley, and also the Stephanie Plum series by Janet Evanovich (laugh out loud all the time when reading her!!) and it has been a while.

About me:
1- I am a knitter. A very unadventurous one, but a knitter, nonetheless..
2- I LOVE books and libraries!! (Maybe I should have answered #8 with librarian)
3- I love my kindle and my iPad almost as much as real books.
4- I wish I could craft ALL the time!
5- I really think I would open a yarn store if I had the $$$$
6- I have developed a fear of heights since having my second child
7- I have met the Pioneer Woman twice and want to do so again!
8- I heart Harry Potter
9- Christmas is my absolute favorite holiday! 
10- I was a gymnast in my younger days.
11- I also love Friends (the show)

Yes, I am total dork! But I don't care!!

Questions for my nominees:
1- Cake or cupcakes?
2- Books or movies?
3- OCD or spontaneous?
4- Live T.V. or DVR?
5- MAC or PC?
(yes, these are all important questions that readers need to know! lol)
6- What is your favorite recipe blog?
7- What is your favorite holiday and tradition for that holiday?
8- What is your favorite food?
9- Did you have an imaginary friend as a child, and if so, what was their name?
10- Have you met any of your blog idols and who was it?
11- What is your middle name and do you like it?

Well, there you go. Now you probably know way more about me than you ever wanted to. I hope it doesn't scare you off! Here are the lovelies that I am nominating:

www.wherethechildplays.blogspot.com
www.yo-yo-mama.com
www.thepiratemama.blogspot.com
www.mommyslosingrolls.blogspot.com
www.isthishowparentingworks.blogspot.com

Please check these ladies out and show them some love!

(P.S. If you are nominated for this award, you also have to link back to the awesome person who nominated you and notify all the blogstars that you nominated on their blogs!)


Wednesday, November 21, 2012

A Little Fall

I love Fall! Cooler air, jeans and long sleeves (well, eventually- it doesn't usually get cold enough to put away the capris and flip-flops until November here in Oklahoma), and pumpkin everything- decorations, yummy treats, wax melts to make your house smell delish, and actual Pumpkins! 

After getting rid of the Jack-O-Lanterns, I decorated a couple of pumpkins with some cute fall-ish ribbon.
 

Cute right? Super easy- ribbon and straight pins. Even for the bows- I just made some loops and pushed a pin through them and then stuck 'em in there!

I came across this recipe on Pinterest, and HAD to try it. It did NOT disappoint! So freakin' good. I am going to have to make some pumpkin cupcakes just so I can make this pumpkin buttercream frosting again. It is amazeballs!! For realz!

Pumpkin Bread with Salted Caramel Drizzled Pumpkin Buttercream
 
My drizzle technique could use some work, as could my food photography. But hey, it tasted awesome and that's what is important right??
 
Well, that is all my Fall Fun... and not a moment to spare since Turkey Day is in about 20 minutes!! I have not participated in all the "Thankful for" posts on the Facebook, but I would like to take a minute to say that I am so thankful for my amazing husband, my awesome kids, and the rest of my wonderful family! I am also thankful for some great friends, all the brave men and women who have fought and continue to fight for our great country, and all the MANY blessings in my life! I wish you and your families a Happy Thanksgiving and many more to come! Now, go eat until you gotta unbutton those pants!!(Or just do like Joey and wear a pair of maternity pants and call 'em your "Turkey eating pants"!!) Gobble Gobble!


Thursday, November 15, 2012

Personalized Cake Carrier

How did I ever live without my Silhouette Cameo?? I freakin' love it! Even more, now that I discovered transfer tape!!! My latest crafty project was a Personalized Cake Carrier. I saw these cuties on Pinterest, of course, and had to pin it to my craft hoard board for later. There are many blogs and websites showcasing these. I linked back to the one I originally pinned.

I started out with a plain cake carrier that I bought at the Walmarts. I decided to monogram it using a couple of different font sizes, and vinyl in contrasting colors. I also used polka dots of different sizes in the same colors I used for my monogram, and threw a third color in there just to mix it up a bit!
Please excuse my craptastic lighting...

I also added "Sweet Treats" to the top, and some coordinating ribbon to the handle.


I used my Silhouette software to design the monogram and polka dots and cut them. I used transfer tape to place all the letters (except the large F) on the carrier, and it was awesome! I didn't have to worry about spacing or anything! Just tried to get them relatively straight and, ta-da! I wish I would have known about this stuff when I put vinyl lettering on my stand mixer!! (Will have to do post on that later.)  I wish you could see all four different ribbons I used for the handle, but, I am not most awesome photographer.( I'm workin' on it.)
This project was quick and easy-peasy! You could also just use a stencil and craft paint to decorate your cake carrier. This way no one will "accidentally" mistake your carrier for theirs when you take goodies somewhere- you know how crime-filled the world of pot-luck is! Haha!

Up next.....some fall decorations and christmas ornaments. Yay!


Monday, November 12, 2012

Sorry!

When I first started this blog, I told myself that I was going to stick with it and blog consistently. Ooops! I have completely failed in that area. What can I say, life happens. With a full time job, a husband, and 2 kids- I get tired. And let's be honest here, lazy. I know stalk some awesome blogger ladies that also work and have a husband and kids to tend to and they post like crazy- I am in awe of them. I want to grow up to be just like them!

However, I have 2 posts in the works, complete with pictures and all, so PLEASE don't give up on me yet!!! I promise to be more consistent!!

Thank you so much for taking time out of your busy day to stop by and see what I am doing. I really, truly appreciate it! Please check back soon and I promise to have some new posts up for you!!!

Sunday, October 28, 2012

Happy Halloween!

I can't believe October is almost over already! It flew by! (and P.S. I failed my fitness challenge miserably the last half of this month...boo!) The kiddos have their costumes, and thankfully I only had to by one costume and a few cheap accessories for the other! Yay! I love Halloween, but I hate how expensive it can get.

While the hubs was off hunting this weekend, a couple of friends who are also "Hunting Widows", brought their girls over and we had a fun sleepover! We started by murdering cleaning out our pumpkins. My dining table looked like a gigantic pumpkin puked all over it.

The carnage...
We saved some of the seeds and baked them later. They turned out pretty tasty! Next up- carving. The kids picked their designs and we got to work. We wound up with a headless horseman, a vampire, and two jack-o-lantern faces (one kinda scary and one like a clown).


The turned out pretty good! Did you notice the drill in the first picture? That nifty attachment helps hollow out your pumpkin after you get all the goop and stringy gunk out. It shaves the meat (for lack of a better word) of the walls of your pumpkin to make it easier to carve. Pretty awesome, right? (My friend bought it last year at Hades Walmart.)

Next, we let the kids attempt a fun treat, but it didn't turn out quite as planned. I bought some marshmallows and chocolate chips so the girls could make 'spiders'. I couldn't find those little crunchy noodle thingies for the legs (and I was too lazy to go back to the candy aisle for licorice) so I substituted (very poorly, I might add) some Pocky instead. Ummm, not exactly the look we were going for. I also just realized the only picture I got of the "spiders" was on my cell phone and I can't get it big enough to post here and you be able to see it. Ugh! Crazy girls + melted chocolate= no good pics for blog post! 

The idea was to melt some chocolate, dip the marshmallows in it, then give them some legs and sprinkles for deocration. Even though they were just big, blobs of goo, some with Pocky sticking out of them and some not, the girls thought they were great. I mean, chocolate and marshmallow- what's not to like??

That is all the "Halloween" I have for you, but I also got a pumpkin recipe and a quick, cheap, fall decoration project done this weekend too. That will be the next post.

I also wanted to share that for breakfast I tried making the canned cinnamon rolls in my waffle maker (I saw the idea on Pinterest of course). Super fast, super easy, and super delish!! You should definitely try it!


What have you been up to?? I love comments, so please share! Also, don't forget to follow me! Just click the button at the side or sign up for email!


Saturday, October 6, 2012

My New Toy!

It's here!!! Finally! I am so freakin' frackin' excited that I am just beside myself!! I finally got my Silhouette Cameo cutting machine!! I only started playing with it last night, so my first project was small, since I was learning the ins and outs of the machine and software. I made a personalized cell phone cover. I cut out a monogram and background for it. I used some patterned scrapbook paper for the background, glittered cardstock for the background shape, and foil cardstock for the monogram letters. I purchased the clear phone cover from Amazon for a less than $4. I made the zebra background by using the fake "phone" paper insert that came in the phone cover as a template for my zebra background to get the right size and cutouts for the camera, kickstand and speaker holes. I used glitter Mod Podge for the "glue".


Now, I plan on making some more (since the covers are so inexpensive), but I need to figure out something different for the glue. I could skip trying to glue it to the cover, and it would probably stay in there just fine. Maybe just regular Mod Podge or some other adhesive would be better? I am not crazy about the streaky look of the Mod Podge, however this could be my fault for not using the right applicator or technique in applying it....just not sure. Overall I am tickled with the outcome! Next up- vinyl decal for my stand mixer!!! I am thinking copying some subway art for it that I found online. 

What projects are you working on? What is your favorite "toy" for crafting? Please share, and don't forget to become a follower of my lil' blog! Just click the "join" button at the side! 

 Happy crafting!!

Tuesday, October 2, 2012

The One Where I Joined A Fitness Challenge


Ok, so I am a huge stalker fan of the 'amazeballs' hookstar, Mama Laughlin.(I totally hijacked those terms from her- I am not that cool.) She is so awesome and I want to be her BFF! Anywho, I also joined the Mama Laughlin Fit Camp. Through this group I have found some cool blogs and joined a fitness challenge called  "31 Days of Being Jillian Michaels' Biotch!" Awesome, right?


The info for the challenge is here at Fitness Unscripted. You should totally check it out. And Mama Laughlin. And the ML Fit Camp page on FB. I am soooo excited to be doing this!

I finished day 2 of the challenge today, and holy-crap-on-a-cracker, am I sore!! Jillian is the devil! (Not really- I heart you Jillian!) I have formed quite the love-hate relationship with Ms. Michaels. I am super proud that I have gotten up before the butt-crack of dawn to get my workouts in. And I am NOT a morning person! I also haven't had my creamer coffee in two days, because after getting all sweaty, coffee just doesn't excite me, ya know??

The really amazing thing about this whole challenge is how many great women are members, and going through the same weight struggles that I am facing. Everyone is sooooo supportive of each other. If you are having a tough time or just want to bitch- these gals are there for ya!! I really hope to get to meet some of these ladies (including ML herself) this spring!!! And we will all be looking hot!!

The calendar link can be found at Fitness Unscripted. And any Jillian DVDs will work! Just get off your butt and get moving!! (Sorry, I can be a little bossy!!) But seriously, if you are looking for some motivation, these blogs and this Fb group are the best! And I guess Jillian is pretty awful cool too!

Don't forget to follow my blog by joining my site, or by email!!

Monday, September 24, 2012

Lamp Makeover

I had several crafty things I wanted to do this weekend, but the mountains of laundry, clutter, toys, and dust put all but one on the back burner. I have a floor lamp in the corner of the living room that I gave a makeover to about 9 or so years ago. After looking at it for the past couple of years, and wondering what the heck I was thinking, I FINALLY gave it a face lift. 

It started out as a plain metal (silver) lamp with a plain white shade. The first makeover consisted of a paint job that was supposed to make it look like leather (we had a western theme going on in our living room at the time...other than that, I really can't explain why leather) and some beaded trim hot-glued to the bottom of the shade. Now, I really thought I had done something when I completed this little project. I mean, the paint job required me to paint on one color, then using a second color and a paper towel, splotch (for lack of a better word) on the second color, giving the delusion illusion of leather. At the time, I thought it looked pretty great, and the Hubs liked it too. Here is a pic of that first makeover (don't laugh to hard):

(I forgot to take a pic before I carried it outside)

I couldn't get a good close up of the "leather" finish, but here is one of the shade.


I found a new shade at Lowe's that coordinates with my rug and I love it! I have been looking for a while and found this several months ago. I have looked at it several times, and finally just bought it. I hate spending money on things like lamp shades (or rugs, curtains, throw pillows, wall art. etc). It wasn't expensive, only $20. I also picked up this spray paint. I waffled back and forth for a while on the paint aisle between this, a satin brown, and another that I think was brushed nickel (it was too dark- almost black). I finally went with this hammered brown and I LOVE it! I was afraid it would be too light, but it turned out perfect!


And now for the finished product.....


Much better, right?! Here are close-ups of the shade and the paint:


Hopefully I will get more projects crossed off my list soon. The ones I have in mind are a little more "crafty" in nature that just a can of spray paint and new lamp shade! Gonna have to break out the Mod Podge! Happy crafting!!


Saturday, September 15, 2012

Coming Attractions

 It has been crazy- busy around here lately with vacation, birthdays, and school starting, so other than my chevron bench and my striped bench, I haven't had much time for crafting. I have a couple of crafty projects waiting to be done, and also a few recipes I really want to try, including this one.....

Ultimate S'more Anniversary Cake

Doesn't that look sooooo amazing!?! I mean, it's got layers of brownies, chocolate chip cookies, and cheesecake, not to mention the s'mores layer!!! It will probably take me all day to make it, but that is a sacrifice I am willing to make. Now, who is willing to come clean the kitchen after I take this on? Anyone? I will share. No takers? Hunh....well fine. Be that way. I won't share if you don't help!

I did give The Sweet Daughter's light switch cover a little sass with some zebra-striped duck tape and a cute frame from Hobby Lobby. I didn't take any before or during pics, beacuse , frankly, it wasn't that interesting and it took about 2 minutes to do. It started out as one of those plain white, cheap-o switch covers. I covered it with duck tape, re-attached it to the wall, and hung the picture frame around it.


Cute, right?! I need to find a good way to secure it to the wall, because we keep knocking it off. 

I also have this going on:


Any guesses as to what this horrid nifty pile-o-yarn might be destined to be?? No? Ok, I will tell ya....it's  going to be an afghan for the Hubs. No, I am not knitting it in the round- I am just using my circular needles because I need them for the length. This bad boy is supposed to be done by October. Ummm...not gonna happen. BUT, I have to get 'er done by November, because that is when Janet Evanovich's newest 'Stephanie Plum' novel comes out and I made the Hubs a deal that I wouldn't read any books until I get it done. Eeek! I gotta get a move on! 

What craftiness do you have going on at your place?? Please share! And PLEASE don't forget to become a follower- I will be your BF for-ev-er!!!


Sunday, September 2, 2012

And Bench #2.....Finally

It was such a pain in the rear to paint the chevron pattern on bench #1, that I talked myself into the idea that I wanted one chevron bench and one striped bench. Yeah, that was the plan all along. Mismatched benches in the same color palette. Yep...unh huh....that was totally my plan. Yep. Sure was.

That little conversation with myself saved me a lot of time, and kept my back pain-free! Sometimes you just need to have a little board meeting with yourself for things to go smoothly.

Now, for bench #2. I made the executive decision to use stripes of varying widths for this bench. The stripes only took about 30 minutes for this bench from start to finish, including: gathering my supplies, taping and painting stripes, clean up, and necessary blog photography.

I used painters tape to tape off my stripes in different widths.

My poor photography skills make this bench look white, but it is actually tan.

Then I painted. I used two coats. I wiped the excess paint from the outside edges using a babe wipe. Those things are great for just about anything....kinda like duct tape! I peeled the tape before the paint dried to get nice, clean lines. And because that is what Pinterest told me to do. (Pinterest knows EVERYTHING!!)

Ta-Da!

Here are the finished benches together. I really kinda love them. What do you think?


Sunday, August 26, 2012

Chevron Bench

I started this project a few weeks ago and have been so busy I haven't had a chance to finish it. After the hubs and I bought our house, I mentioned I would like to get a couple of small benches and put on either side of our back door. So, he made me some! How sweet, right?! They were just right, and I decided  a cute paint job was in order. Now, this was about 10 years ago, and the dorky awesome paint job I gave them has since passed its prime. Apparently I was feeling quite patriotic, because I went with a red, white and blue color palette. I used paint stamps and everything!!! (Insert eye-roll here.) Luckily Unfortunately, I forgot (I really did) to take 'before' pictures so I could share my past artistic abilities with you. Darn it! It would have been embarrassing to post them for all to see, and 'oh, the horror!!' if they would have made their way onto Pinterest, but I was willing to make the sacrifice just to show the progress.

First I painted the benches with some leftovers from when we gave our Airstream a facelift. I then printed off a chevron pattern that I downloaded from www.billiemonster.com. I taped the patter to my bench, and began tracing it with a ball-point pen, pressing hard enough to leave an indention of the pattern in the wood. I found this idea on Pinterest from "That's My Letter".

Ignore the scribble marks- Punky-Pie was helping.

Now here is where I tell you that this project did not go as smoothly as I had planned. My first mistake was not printing enough of my template to cover the entire bench at once. I was dumb naive enough to think I could do a section at a time and just move the pattern to finish. HA! Of COURSE it didn't get lined up just right! Also, by the time I finished tracing the first section, I had poked holes in the pattern, causing me to get ink on the other sections. Fortunately, paint covered this up, but it was a pain in the arse all the same. I got the pattern traced on both halves of the bench, but needed to do one more stripe across the bottom. Now, by this time I had had enough- my hand was cramping and my back was hurting from all the bent-overness. The pattern had also had enough. I wound up having to free hand the bottom stripe most of the way because I couldn't get the pattern to line up right. I am not sure what happened there.

I first went along the outer edges of the indentions to get the outline, and then went back with a larger brush and filled it in.


After what seemed like years, but was actually only HOURS, I finished!! Ta-da!! I am really happy with the results!! 


All that work and only one bench is done! UGH! Now, for what I learned. I think the 'tracing' technique would be best used for smaller projects where you want to use lettering. I did see some projects using a chevron design where the design was done using painter's tape, but I didn't think I could get it right. IF I decide to make the benches match, I will try this technique instead. Then I will also be able to use a paint roller instead of small brushes to get a better, more even coat of paint for my stripes. I did look for a stencil of a chevron pattern, but couldn't find one in my town. 

I am happy with the way it turned out, but I my execution was definitely lacking! If I don't place the benched close to each other, they don't have to match, right??? Right???

I hope you can learn from my errors in judgement on this one, and if you have any suggestions for other techniques, ideas for the other bench, or any other random (but non-snarky comment...I am the only one allowed to do snarky here!) comments, PLEASE share!


Wednesday, August 1, 2012

Ahhh...Quiet!

I have two daughters, The Sweet Daughter and Punky-Pie, who are 7 and 2. It is safe to say that they don't always see eye to eye on what to watch on tv (gasp! yes I let my kids watch tv...and probably too much of it. Don't judge!!). BUT! I recently discovered the Disney apps you can download and they can watch whatever Disney show they want. For free. ANY time. Yay!! I downloaded the Disney Jr. app and this way when the Sweet Daughter is watching 'Good Luck Charlie' on the television, Punky-Pie can watch 'Mickey Mouse' on the iPad, and for a short time there is calm in our home.


 I could have downloaded the Disney XD app or one that shows the older kid shows, but those are the shows that are on during prime time. I chose Disney Jr. because Mickey Mouse and Doc McStuffins are ususally only on in the morning. Now I have to see if there is a Nick Jr. app. Punky-Pie loves her some Dora and Diego. Oh, and don't forget Oswald!

Something else that makes things handy with the iPad or the DVD player in the car is the nifty set of headphones that Punky-Pie is sporting in the picture above. They came in a pac with a couple of other types of headphones and an adapter that lets you plug to sets of headphones or earbuds into one device.  I found this pack at the Family Dollar store and it has been well worth the $10 I spent on it!

What are some gadgets and apps you love?? Would love to hear about them! And don't forget to follow my blog via email!

Sunday, July 29, 2012

Lately....

Well, I didn't get this week's project finished, but I did get it started. Here's a hint...it involves a chevron pattern. I didn't finish because I forgot to get the white paint I need for it. I did however get the chance to use a technique that I pinned from Pinterest a while back, and so far so good! It's from the blog "That's My Letter". She personalizes all kinds of stuff and the way she does it is super easy!

I tried another something that I pinned, which was to hold my freshly (still wet) painted finger nails into a bowl of cold water for 3 minutes to instantly dry my nails. I was very skeptical, but it worked GREAT!

In addition to the breakfast pizza that I made earlier this week, I made a recipe from another blog that was a hit at my house. French bread pizza from "My world made by hand". I've made this one before and it's super quick and easy-peasy! Oh, and yummy too!

I hope to get my current crafty project finished up and posted this week. What have you been crafting and cooking lately? I would love for you to share!

Tuesday, July 24, 2012

Yummy Breakfast Pizza

So, what do you get when you throw together a crust of crescent roll dough, some frozen hash browns, scrambled eggs, sausage and a lot of yummy cheese????


You get an EMPTY pan!! Tonight for dinner I made Breakfast Pizza, and it was deee-lish! The original recipe I found for this was from the "Tasty Kitchen" section of www.thepioneerwoman.com. When I got ready to cook it and realized it called for egg substitue I went back to Tasty Kitchen and looked at other 'breakfast pizza' recipes. I wound up combining a couple of different ones and making them my own.


Ingredients:
1 can crescent rolls
8 eggs
1/4 cup milk
1 cup cheddar cheese (I used a cheese blend that I am partial to from Walmart)
2 tbsp. grated parmesan cheese
1 cup frozen shredded hashbrown potatoes
1 lb. ground sausage

Directions:
Pull dough apart into triangles and arrange on greased pizza pan, smashing seams together to form a circle. Heat oven to 375 degrees. Brown sausage in skillet, drain off the grease. Set aside. Scramble eggs and milk together in skillet until done. Layer sausage, hashbrowns, and eggs onto dough, then top with cheeses. Bake for 10-12 minutes, or until crust is done and cheese is all ooey-gooey melty! Slice, serve, and dig in!! Yummm! (This made 8 good-sized slices.)


We all topped ours with some salsa once we got it on our plates. You could also add some bell pepper and onion to your sausage when cooking, use mozerella cheese, or even a regular pizza crust. The crescent roll dough made a good breakfasty-type crust in my opinion. Have some fun- add whatever toppings you and your family love! As you can see from the first picture in this post, there were NO leftovers! This will definitely be in our regular rotation of meals, both for breakfast and dinner. I hope you enjoy!

P.S.
Don's forget to follow my blog via email so you don't miss a post! Thanks!